Showing posts with label acrylic paint. Show all posts

Sunday, September 20, 2015

Vinayakar chathurthi nails

Hello! Belated Vinayakar Chathurthi wishes! Hope everyone had a great time 😊😊😊

I did my nails based on this, here's my take on it!


On my fore finger, I  have the kozhukattai , vada and sundal on a banana leaf.

On my middle finger, I did the traditional kolam , and the base colour was meant to look like the floor.


On my ring finger, we have the birthday baby Ganesh.

Finally on my ring finger I drew the AUM symbol.

Hope you like it! 😊😊😊

-அபிநயா

Saturday, November 17, 2012

One stroke acrylic paint design

Hey !! After a loooong time I finally sat down and did a new nail art..

I've been wanting to try out the one stroke manicures for a long time, but i could never find the right sized brush. Now I finally got a small flat end brush and decided to try it out .


The paint was a little watery, so the colours weren't so opaque in one coat, i havd to go over the flowers again to make them visible.


I did the flower only on my thumb and middle finger, cause they are wider and have more space, so it;s easier to paint the flowers.

One the remaining nails I just did one stroke leaves. I used red and white for the flowers, and green and yellow for the leaves. as usual a base coat and top coat, i painted my base black to make the flowers stand out more.


அபிநயா <3

Enhanced by Zemanta

Sunday, July 22, 2012

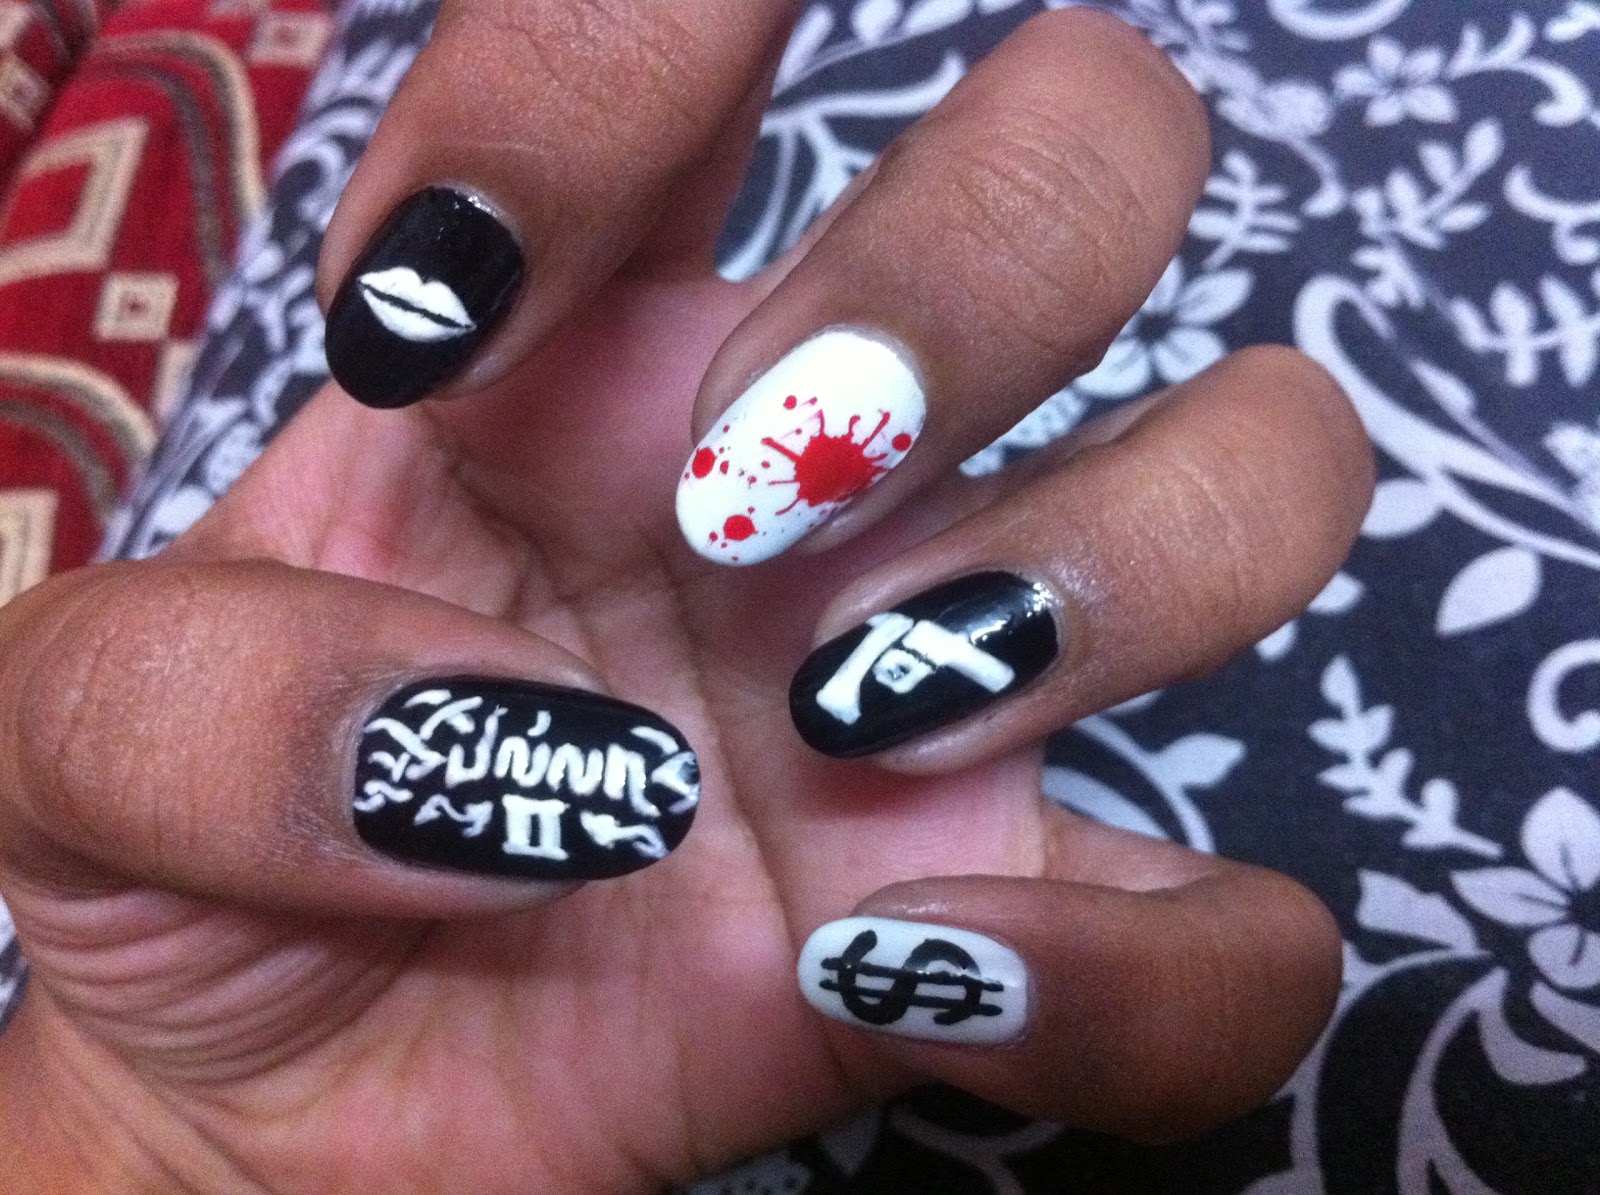
BILLA 2 !!!

To all my Tamil friends out there, are you an Ajith (Thala ) fan??? If you are, then this is the design for you!!


I don't think i can actually type the steps on how to do it, but you can try your own creations based on this nail art :)

I applied alternating black and white base for the nails, and did all the designs (except the middle finger) using acrylic paint.


I did the main Billa logo on my thumb. My thumb nail recently broke :( so I wasn't able to complete the design on the right side. I suggest you apply a clear coat before painting using white acrylic on black nails, coz over time the white mixes with the black and makes it a sort of grey.


For the fore finger, i painted on the lips using white acrylic. You can also use konad stamping , but i just felt this looked better.

The middle finger was done using konad stamping kit with Red on a white base to form a sort of splattered blood effect.

The gun design was inspired by the gun at the end of  007 (James bond style ;) )

And finally, what's a don without some money?? I just painted it on a white base using black acrylic.

Any doubts, feel free to comment below :)


Hope you liked the design and even more the movie .. Coz i thought it was fantastic!! :D


En nanbana iruka thaguthi venam, aana ethiriya iruka kandipa thaguthi venum !!


Saturday, June 30, 2012

Silver flower Nail Art

For all those beginners out there, this is the design for you!

Can be worn on noth short and long nails :)

Extremely simple yet oh so elegant, no one would believe it was your first attempt !!


Procedure  :

Step 1  :  Apply a base coat to protect your nails and prevent them from staining.

Step 2  : Apply a your favourite colour to all your nails to form the background for your silver flower.

Step 3  : Take a silver nail polish or acrylic paint and place three dots in a curve at the base of your nail at a corner.

Step 4  : Before it dries, quickly, with a toothpick, press and drag on the dot toward the corner to create a petal (tear drop) shape.

Step 5 : Repeat the same for the remaining 2 dots and on all your nails.

Step 6  : For an extra touch of glamour, you can sprinkle some glitter over it while the paint is still dry, but remember, this can get quiet messy and do not try if your in a hurry.

Step 7  : Next apply some clear polish at the corner of your nail, in the middle of your pflower and place a matching rhinestone.

Step 8  : Finally apply a layer of top coat to seal in your design and the rhinestone.

NOTE : For those of you with long nails, you can even add another flower on he opposite corner to fill in the empty space :)


Cute Puppy Face Nail Art

This is a cute and unique nail design which is sure to make people take a second look at it!!

It's super cute and super easy!! Here's how :


PROCEDURE :

Step 1  : Apply a bsae coat to protect your nails and to prevent them from staining

Step 2  : Paint 2 coats of the colour you want your puppy to be.

Step 3  : On your fore finger and pinky, draw 3 short lines for the whiskers.

Step 4  : On your middle finger and ring finger, draw 2 semi-circular shapes in white (nail polish or acrylic). Make sure that they are painted towards each other.

Step 5  : Now using a black polish or acrylic paint, paint smaller semi-circles in side them, and also draw the outline for the white semi-circle to define the eyes. An alternative way to do this would be to first draw a slightly  larger semicircle of black, underneath the the white one, to form the outline.

Step 6  : Now place two tiny white dots in the black semi circles for the highlights in the eyes.


Step 7  : Now for your thumb, work on it horizontally.

Step 8  : Paint a small triangle in pink for the nose.

Step 9  : Next, outline the nose with black and draw two curved lines for the mouth. Using a toothpick, place a few dots around the mouth and nose.

Step 10  : And thats it!! Finish off with a top coat to seal your design :)


Wednesday, June 27, 2012

Black and Silver Nail art

This design looks glamorous and perfect for any occasion :)

Here's how you do it !!


Procedure :

Step 1  : Apply a base coat to protect your nails and prevent them from staining.

Step 2  : Apply black base for all your nails except one of them, either your ring finhger or your thumb.

Step 3  : Paint the left out finger Silver.

Step 4  : Using a black nail polish or acrylic paint and a thin brush, paint some swirls and curved lines to create an abstract design.

Step 5  : Repeat the same with silver polish on the remaining nail.

Step 6  : Finish off with a top coat to seal in your design :)


Saturday, June 23, 2012

Red and gold ethnic nail art

This gorgeous design can be worn for any traditional events for that extra perfect hands!!

Procedure : 

Step 1  : Apply a base coat to protect your nails and prevent them from staining.

Step 2  : Apply a 2 coats of a rich red coloured nail polish on all your nails.

Step 3  : After the red has dried, take some gold nail polish or acrylic paint and using a thin brush, draw the design as shown.

Step 4  : Then, using a gold sparkle, go over the central swirl design alone.

Step 5  : Apply a top coat and your done!!


Alternative :

On the thumb, you can do a different design as shown:


Step 1  : Apply red in 2 circular motions along the edge.

Step 2  : Using the same gold colour and a thin brush, draw the 2 curved lines

Step 3  : Now using a black polish or acrylic paint, draw the design in the blank area of your nail.

Step 4  : Finish off with a top coat :)


Friday, June 15, 2012

ANGRY BIRDS NAIL ART

This is one of my most favourite nail art designs i've ever done!!


Typing a tutorial for this design is difficult... so I'll just be uploading the pics :)


Hope you like it !!


Here are the pictures I used as a guide :