Showing posts with label rhinestone. Show all posts

Sunday, September 16, 2012

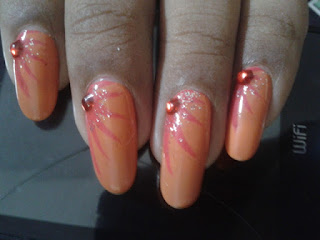
Fiery Hot Nail Art


Hey!! This hot nail art is really easy and quick to do, and looks incredible.

You can of course, use other colour of your choices, I loved the way these two colours complemented each other.


Procedure  :

Step 1  : Apply a base coat to prevent your nails from staining and also to protect them. I once applied this orange without a base coat and when I removed it, all my nails had turned orange and looked horrible.

Step 2  : Apply two coats of a pastel orange nail polish on all yous nails and let them dry.


Step 3  : With a reddish pink nail striper, or using a thin brush, paint on some thin stripes, radiating from the bottom right corner of your nails. Make sure each stripe tapers towards the end.

Step 4  : Take a silver glitter polish and dab on lightly at the corner alone, and also apply a red rhinestone while the polish is still wet.

Step 6  : Finally apply a layer of top coat to seal it all in, and you're done !!


Enhanced by Zemanta

Sunday, September 9, 2012

All that glitters


This is an extremely easy nail art for beginners and people who find it hard to do any intricate designs on their nails!

All that is required are a glitter polish, a glitter striper and some small rhinestones! Here's the procedure>


Procedure :

Step 1  : Apply a base coat to prevent your nails from staining and also to protect them.

Step 2  : Apply a silvery glittery nail polish on all your nails. Usually the glittery polishes are quite translucent, so you might need 3 to 4 coats to get it opaque.

Step 3  : Take a gold glittery striper and draw a wavy line along the diagonal of your nail.

Step 4  : Use black and white rhinestones to create the flowers on the opposite corners. One one corner, place a black rhinestone at the corner and white rhinestones around it , on the opposite corner, place a white rhinestone at the center and surround it my black rhinestone.

Step 5  : Finish it off with a top coat to protect the stones as well as the design. And your done!!


Note : You might find it a little difficult to remove this design due to all that glitter, i suggest you soak some cotton in nail polish remover and place it on your nails for about two minutes, and then gently wipe it off. This works much better than repeatedly wiping without waiting.  

Sunday, September 2, 2012

Spiral Nail Art


Hey everyone... This is a short and quick nail art and can be done easily on short or long nails


All you need for this nail art is a base colour and a nail art pen in a diferent colour.The colour can be contrasting, or different shades of the same colour.

If you dont have a nail art pen, you can try this with your nail art brush, but you might need to be steady and careful. So here's the procedure :)


PROCEDURE :

Step 1  : Apply a base coat to protect your nails and also to prevent them from staining.

Step 2  : Apply 2 layers of the nail polish in your desired colour.

Step 3  : Using a nail art pen or brush, care draw a small spiral at the bottom corner of your nail.

Step 4  : Draw a slightly larger spiral next to it, going in the opposite direction. If you have short nails, you can stop at this, for longer nails, continue with the steps below.

Step 5  : Draw two curvy lines as shown in the pictue on the opposite corner of your nails.

Step 6   :If required , fill in the gap between the lines with a glitter polish and add some stones.

Step 7  : Finish off with a final layer of top coat to protect the design. That's it :)


Thursday, August 30, 2012

Glitter + Flower Nail Art

Hey people !!

This is a simple design for all those beginners out there and also for people who lack patience ;)

It can me done on long nails and also modified for short nails!!

You don't even need to know any techniques for this cute design!!


PROCEDURE :

Step 1  : Paint a base coat to protect your nails and also to prevent them from staining.

Step 2  : Next apply a base colour of your choice. I suggest apply 2 thin layers instead of one thick gooey layer.

Step 3  : Using a dotting tool, and the colour of your choice for the flower, dot 5 or 6 dots in a circle, at the bottom corner of your nail to form the flower.

Step 4  : Apply a dot of  clear nail polish at the centre and apply a rhinestone.

Step 5  : If you have short nails, you can stop with this design. Or modify the following steps to the top part of your nails.

Step 6  : Apply clear polish diagonally at the tip of your nail. Quickly, before it dries, sprinkle some glitter on it.


Step 7  : Keep a sheet of paper beneath your nail to pour back the excess glitter back into the container. Using a fan brush, lightly press onto the glitter to set it, and then brush the excess off.

Step 8  : Finish off with a top coat to seal the rhinestone, glitter and your beautiful design. :)

Saturday, June 30, 2012

Silver flower Nail Art

For all those beginners out there, this is the design for you!

Can be worn on noth short and long nails :)

Extremely simple yet oh so elegant, no one would believe it was your first attempt !!


Procedure  :

Step 1  :  Apply a base coat to protect your nails and prevent them from staining.

Step 2  : Apply a your favourite colour to all your nails to form the background for your silver flower.

Step 3  : Take a silver nail polish or acrylic paint and place three dots in a curve at the base of your nail at a corner.

Step 4  : Before it dries, quickly, with a toothpick, press and drag on the dot toward the corner to create a petal (tear drop) shape.

Step 5 : Repeat the same for the remaining 2 dots and on all your nails.

Step 6  : For an extra touch of glamour, you can sprinkle some glitter over it while the paint is still dry, but remember, this can get quiet messy and do not try if your in a hurry.

Step 7  : Next apply some clear polish at the corner of your nail, in the middle of your pflower and place a matching rhinestone.

Step 8  : Finally apply a layer of top coat to seal in your design and the rhinestone.

NOTE : For those of you with long nails, you can even add another flower on he opposite corner to fill in the empty space :)


Thursday, June 14, 2012

Elegant green konad nail art with a sparkle

This is a neat and elegant nail art which can be done with a wide range of different colours depending on your outfit !!


PROCEDURE :

Step 1  : Apply a base coat to protect your nails and also to prevent them from staining.

Step 2  : Apply the base colour of your choice, in this case i chose a beautiful glittery light green.

Step 3  : Using konad black special nail polish and konad plate number m45, stamp th criss cross design diagonally along the tip of your nail.


Step 4  : Put a dot of clear polish on the opposite corner and apply a star or a normal rhinestone.

Step 5  : Finally add a layer of top coat to seal in the design :)


Sunday, June 3, 2012

Pink and black konad nail art with Rhinestone

Hey !! This design may look complicated, but its totally easy once you master your konad skills!!

Can be done on long or short nails!!


Procedure  :


Step 1  : Apply a base coat to protect your nails and prevent them from staining.

Step 2  : Apply pink (or any other colour you prefer) nail polish diagonally , at around 2/3rd of your nails. You can also use a cellophane tape to mark off the required area. (If your not sure how to do with the cellophane tape, details steps are given in the patchwork tutorial)

Step 3  : Next , after the pink has dried, using black konad special nail polish and konad plate no. m45, print the netted design along the diagonal of the nail polish. Try to align it as much as possible, but dont worry, it doesn't have to be perfect, we will be correcting the edge.

Step 4  : Now, using regular black polish or acrylic paint and a thin brush, draw a line along the upper and lower sides of the net to even it out.


Step 5  : Apply a tiny drop of clear nail polish at the bottom of the nail, at the opposite corner of the diagonal.

Step 6  : You can finish it at this stage, or if you want to fill in the top portion, you can stamp on some other small designs from your konad plates. Here I have used plates : m3 and m2.

Step 7  : Finally finish off with a top coat to seal your design and rhinestone :)