Wednesday, December 5, 2012

Aquarium Nail art


This has definitely gotta be one my most favourite nail art I've ever done!!


I made it based on a painting we have up on our wall , I'll post the pic below:


I started off with a  light blue base, then using a fan brush, i went across each nail a couple of times  with white and a darker blue to get the water effect.


I then painted on the small fishes in yellow, and then went over it with red. I used a dotting tool to make the eyes and painted on some scales using black.


Finally I used a thin striping brush and an ivy green to paint on the sea weed, a few white dots for bubbles, finish off with a top coat and your done!!
Enhanced by Zemanta

Saturday, November 17, 2012

One stroke acrylic paint design

Hey !! After a loooong time I finally sat down and did a new nail art..

I've been wanting to try out the one stroke manicures for a long time, but i could never find the right sized brush. Now I finally got a small flat end brush and decided to try it out .


The paint was a little watery, so the colours weren't so opaque in one coat, i havd to go over the flowers again to make them visible.


I did the flower only on my thumb and middle finger, cause they are wider and have more space, so it;s easier to paint the flowers.

One the remaining nails I just did one stroke leaves. I used red and white for the flowers, and green and yellow for the leaves. as usual a base coat and top coat, i painted my base black to make the flowers stand out more.


அபிநயா <3

Enhanced by Zemanta

Monday, October 15, 2012

Gold and black nail art

Bad news, I locked my box of nail polishes and now I'm not able to open it :-/ Left with only a few I had outside.


I did this nail art with this beautiful gold polish I got, since the rest are stuck inside and did the design on it with some black eye liner and a thin brush... I hadn't applied the top coat yet, hence the dried black eye liner design looks matte.


The eyeliner has to be dry before you apply the top coat , otherwise it rubs away when you paint over it. Also apply it quickly in quick few strokes.


Enhanced by Zemanta

Friday, September 28, 2012

BLING YOUR NAILS


Hey everyone!!

Bling out your nails to create the ultimate fun and sparkly nails!! They are so  easy and so fun to do!!


PROCEDURE :


Step 1  : Apply a base coat to protect your nails and prevent them from staining.

Step 2  : Apply 2 coats of a silver (or gold if you want) nail polish, and before it dries, quickly place rhinestones of different colour or same colour as per your choice all over your nails.


Step 3  : Finish off with a very good top coat to protect your designs and prevent the stones from falling off.

Ant that's it.. you're ready to rock those nails!!

Here's a picture of my nails taken in sunlight without any editing :


TIP :  To remove this design, i suggest you apply some nail polish remover on cotton and press on your nails for some time, then once the nail polish has softened a little, pick out the stones manually, and then wipe off the remaining polish with some remover.


Enhanced by Zemanta

Sunday, September 16, 2012

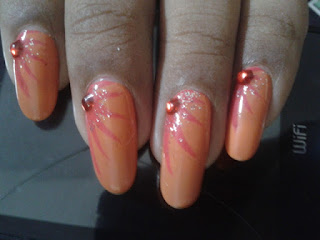
Fiery Hot Nail Art


Hey!! This hot nail art is really easy and quick to do, and looks incredible.

You can of course, use other colour of your choices, I loved the way these two colours complemented each other.


Procedure  :

Step 1  : Apply a base coat to prevent your nails from staining and also to protect them. I once applied this orange without a base coat and when I removed it, all my nails had turned orange and looked horrible.

Step 2  : Apply two coats of a pastel orange nail polish on all yous nails and let them dry.


Step 3  : With a reddish pink nail striper, or using a thin brush, paint on some thin stripes, radiating from the bottom right corner of your nails. Make sure each stripe tapers towards the end.

Step 4  : Take a silver glitter polish and dab on lightly at the corner alone, and also apply a red rhinestone while the polish is still wet.

Step 6  : Finally apply a layer of top coat to seal it all in, and you're done !!


Enhanced by Zemanta

Sunday, September 9, 2012

All that glitters


This is an extremely easy nail art for beginners and people who find it hard to do any intricate designs on their nails!

All that is required are a glitter polish, a glitter striper and some small rhinestones! Here's the procedure>


Procedure :

Step 1  : Apply a base coat to prevent your nails from staining and also to protect them.

Step 2  : Apply a silvery glittery nail polish on all your nails. Usually the glittery polishes are quite translucent, so you might need 3 to 4 coats to get it opaque.

Step 3  : Take a gold glittery striper and draw a wavy line along the diagonal of your nail.

Step 4  : Use black and white rhinestones to create the flowers on the opposite corners. One one corner, place a black rhinestone at the corner and white rhinestones around it , on the opposite corner, place a white rhinestone at the center and surround it my black rhinestone.

Step 5  : Finish it off with a top coat to protect the stones as well as the design. And your done!!


Note : You might find it a little difficult to remove this design due to all that glitter, i suggest you soak some cotton in nail polish remover and place it on your nails for about two minutes, and then gently wipe it off. This works much better than repeatedly wiping without waiting.  

Sunday, September 2, 2012

Spiral Nail Art


Hey everyone... This is a short and quick nail art and can be done easily on short or long nails


All you need for this nail art is a base colour and a nail art pen in a diferent colour.The colour can be contrasting, or different shades of the same colour.

If you dont have a nail art pen, you can try this with your nail art brush, but you might need to be steady and careful. So here's the procedure :)


PROCEDURE :

Step 1  : Apply a base coat to protect your nails and also to prevent them from staining.

Step 2  : Apply 2 layers of the nail polish in your desired colour.

Step 3  : Using a nail art pen or brush, care draw a small spiral at the bottom corner of your nail.

Step 4  : Draw a slightly larger spiral next to it, going in the opposite direction. If you have short nails, you can stop at this, for longer nails, continue with the steps below.

Step 5  : Draw two curvy lines as shown in the pictue on the opposite corner of your nails.

Step 6   :If required , fill in the gap between the lines with a glitter polish and add some stones.

Step 7  : Finish off with a final layer of top coat to protect the design. That's it :)


Thursday, August 30, 2012

Glitter + Flower Nail Art

Hey people !!

This is a simple design for all those beginners out there and also for people who lack patience ;)

It can me done on long nails and also modified for short nails!!

You don't even need to know any techniques for this cute design!!


PROCEDURE :

Step 1  : Paint a base coat to protect your nails and also to prevent them from staining.

Step 2  : Next apply a base colour of your choice. I suggest apply 2 thin layers instead of one thick gooey layer.

Step 3  : Using a dotting tool, and the colour of your choice for the flower, dot 5 or 6 dots in a circle, at the bottom corner of your nail to form the flower.

Step 4  : Apply a dot of  clear nail polish at the centre and apply a rhinestone.

Step 5  : If you have short nails, you can stop with this design. Or modify the following steps to the top part of your nails.

Step 6  : Apply clear polish diagonally at the tip of your nail. Quickly, before it dries, sprinkle some glitter on it.


Step 7  : Keep a sheet of paper beneath your nail to pour back the excess glitter back into the container. Using a fan brush, lightly press onto the glitter to set it, and then brush the excess off.

Step 8  : Finish off with a top coat to seal the rhinestone, glitter and your beautiful design. :)

Saturday, August 11, 2012

Micro Art - A New Venture


I have recently been side tracked into the field of micro-art, or also know as miniature art.

For those of you who haven't come across this term, it's actually art, done on a much smaller scale, usually on the tips of pencils or within the eye of a needle!!!

Willard Wigan, Dalton Ghetto are 2 remarkable micro artists, the former specializing in working inside the eye of a needle usually requiring a microscope to view, while the latter specializes in sculpting on the tip of a pencil.


Inspired by a movie I watched recently, I thought of trying out this minute art and came up with this. I know it's no where near as intricate as the works of Wigan or Ghetto, but hey, I tried my best :)

I carved this heart out of the lead portion of a normal red colouring pencil using a paper cutter.

Click on the following links for more information and to see some of their breathtaking art works :

Dalton Ghetto
Willard Wigan

Monday, August 6, 2012

Eye make up


Hey  :)

This is my first attempt at doing eye make-up, so sorry if I made any the mistakes...

I tried a rose and brown combination, which I saw in a tutorial and I really loved how the 2 colours went with each other.... Here's my look :)


Do comment your opinions....

Saturday, August 4, 2012

Marbling without water

Hey everyone !!

I tried doing water marbling for a change but it didnt come out so well... so i decided to do it my way

You dont need water, tapes or any patience, just get a couple of colours of nail polishes, a toothpick and your ready !!


Procedure :

Step 1  :  Apply a base coat to prevent your nails from staining and protect them.

Step 2  : Take 2 or 3 of your favourite colour, they can either be different shades of the same colour like I've done here, or you can chose different colours.

Step 3  : Place 1 or blobs of the different colours on your nail, work on one nail at a time for this nail art.

Step 4  : Quickly using the toothpick, swirl the colour together, make sure you dont mix them too much, you want the individual colours to show through.

                                                              Source: Uploaded by user via M Abi on Pinterest

Step 5  : Since we've used a thick layer of nail polish, let it dry completely before you proceed. You can stop with this and add a top coat, or you can follow the additional steps.
Step 6  : I've added a layer of silver glitter polish , and placed a few stars to glam it up , but this is optional. You can add whatever you want, without overdoing it thereby loosing the marbling effect underneath.

Step 7  : Finish off with a top coat and your design's complete!! :)


                                           Source:
Uploaded by user via M Abi on Pinterest

Sunday, July 22, 2012

BILLA 2 !!!

To all my Tamil friends out there, are you an Ajith (Thala ) fan??? If you are, then this is the design for you!!


I don't think i can actually type the steps on how to do it, but you can try your own creations based on this nail art :)

I applied alternating black and white base for the nails, and did all the designs (except the middle finger) using acrylic paint.


I did the main Billa logo on my thumb. My thumb nail recently broke :( so I wasn't able to complete the design on the right side. I suggest you apply a clear coat before painting using white acrylic on black nails, coz over time the white mixes with the black and makes it a sort of grey.


For the fore finger, i painted on the lips using white acrylic. You can also use konad stamping , but i just felt this looked better.

The middle finger was done using konad stamping kit with Red on a white base to form a sort of splattered blood effect.

The gun design was inspired by the gun at the end of  007 (James bond style ;) )

And finally, what's a don without some money?? I just painted it on a white base using black acrylic.

Any doubts, feel free to comment below :)


Hope you liked the design and even more the movie .. Coz i thought it was fantastic!! :D


En nanbana iruka thaguthi venam, aana ethiriya iruka kandipa thaguthi venum !!


Friday, July 13, 2012

Red and Black Drag nail art

Hey everyone!! Ever wanted to do a quick and easy design???

Can be done on short or long nails!!

Then this is the one for you!! Simple, easy and quick to do!! Here's how :D


                                           Source: Uploaded by user via M Abi on Pinterest


Procedure :


Step 1  : Apply a base coat to protect your nails and prevent them from staining.

Step 2  : Apply red to half your nail, and black to the other half and let it dry for a few minutes. We do this step because when we drag the nail polish polish, we don't want our nail to show through.

Step 3  : Now , apply a slightly thicker coat of red and black to the respective halves of your nails and before it dries, quickly, using a needle, drag the nail polish from the red to the black horizantally to form stripes.


Step 4  : Repeat the same process to all the nails, and let it dry. This will take some time since we have applied a thick coat of nail polish.

Step 5  : Finally apply a layer of top coat to seal your design and your done !! :)

Alternative : If you have long nails, you can try doing it only on your tips for a unique French tip , or you could  try dragging from both sides , it's all up to you!!


Sunday, July 1, 2012

Patchwork Abstract Nail Art

Have a multi-coloured dress and need colourful nails to match them???


Here's the design for you!!

Keep these colours as they are or change them around as you wish :)


Procedure  :

Step 1  : Apply a base coat to protect your nails and prevent them from staining.

Step 2  : Apply the lightest colour as the base on all your nails.

Step 3  : Take a a piece cellophane tape, stick it several time on your arm and peel off to reduce it's stickiness.

Step 4  : Now, make sure the base coat is completely dry before youapply the tape along one diagonal.

Step 5  : Now apply the darkest colour on the area not covered by the tape.


Step 6  : After the paint is partially dry, remove the tape. Let the colour dry completely.

Step 7  : Now again take another piece of tape, reduce it's stickiness and apply it along the opposite diagonal.

Step 8  : Fill the uncovered area with the medium dark colour. After the polish is partially dry, remove the tape.

NOTE : For those of you with a steady hand, you can try doing it without the tape and with a thinner brush.
Also you can do the medium dark colour using tape, and fill the darkest colour with a thinner brush.
You can change the colours as required, they dont necessarily have to be different shades of the same colour.


Step 9  : Using the lightest colour and a dotting tool (or the end of a bobby pin) place some dots on the medium dark coloured area.

Step 10  : Finally, with a thin brush and black nail polish or acrylic paint, draw some short lines at the junctions of the colours to form the stitches.

Step 11  : Finish off with a top coat to seal in your beautiful design :)


Here is a different version of it using 4 colours, and without the dots and stitches.