Friday, September 28, 2012

BLING YOUR NAILS


Hey everyone!!

Bling out your nails to create the ultimate fun and sparkly nails!! They are so  easy and so fun to do!!


PROCEDURE :


Step 1  : Apply a base coat to protect your nails and prevent them from staining.

Step 2  : Apply 2 coats of a silver (or gold if you want) nail polish, and before it dries, quickly place rhinestones of different colour or same colour as per your choice all over your nails.


Step 3  : Finish off with a very good top coat to protect your designs and prevent the stones from falling off.

Ant that's it.. you're ready to rock those nails!!

Here's a picture of my nails taken in sunlight without any editing :


TIP :  To remove this design, i suggest you apply some nail polish remover on cotton and press on your nails for some time, then once the nail polish has softened a little, pick out the stones manually, and then wipe off the remaining polish with some remover.




Enhanced by Zemanta

Sunday, September 16, 2012

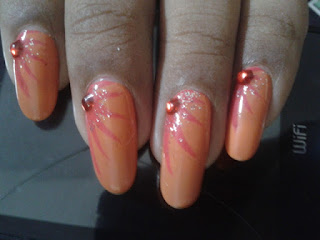
Fiery Hot Nail Art


Hey!! This hot nail art is really easy and quick to do, and looks incredible.

You can of course, use other colour of your choices, I loved the way these two colours complemented each other.


Procedure  :

Step 1  : Apply a base coat to prevent your nails from staining and also to protect them. I once applied this orange without a base coat and when I removed it, all my nails had turned orange and looked horrible.

Step 2  : Apply two coats of a pastel orange nail polish on all yous nails and let them dry.


Step 3  : With a reddish pink nail striper, or using a thin brush, paint on some thin stripes, radiating from the bottom right corner of your nails. Make sure each stripe tapers towards the end.

Step 4  : Take a silver glitter polish and dab on lightly at the corner alone, and also apply a red rhinestone while the polish is still wet.

Step 6  : Finally apply a layer of top coat to seal it all in, and you're done !!


Enhanced by Zemanta

Sunday, September 9, 2012

All that glitters


This is an extremely easy nail art for beginners and people who find it hard to do any intricate designs on their nails!

All that is required are a glitter polish, a glitter striper and some small rhinestones! Here's the procedure>


Procedure :

Step 1  : Apply a base coat to prevent your nails from staining and also to protect them.

Step 2  : Apply a silvery glittery nail polish on all your nails. Usually the glittery polishes are quite translucent, so you might need 3 to 4 coats to get it opaque.

Step 3  : Take a gold glittery striper and draw a wavy line along the diagonal of your nail.

Step 4  : Use black and white rhinestones to create the flowers on the opposite corners. One one corner, place a black rhinestone at the corner and white rhinestones around it , on the opposite corner, place a white rhinestone at the center and surround it my black rhinestone.

Step 5  : Finish it off with a top coat to protect the stones as well as the design. And your done!!


Note : You might find it a little difficult to remove this design due to all that glitter, i suggest you soak some cotton in nail polish remover and place it on your nails for about two minutes, and then gently wipe it off. This works much better than repeatedly wiping without waiting.  

Sunday, September 2, 2012

Spiral Nail Art


Hey everyone... This is a short and quick nail art and can be done easily on short or long nails


All you need for this nail art is a base colour and a nail art pen in a diferent colour.The colour can be contrasting, or different shades of the same colour.

If you dont have a nail art pen, you can try this with your nail art brush, but you might need to be steady and careful. So here's the procedure :)


PROCEDURE :

Step 1  : Apply a base coat to protect your nails and also to prevent them from staining.

Step 2  : Apply 2 layers of the nail polish in your desired colour.

Step 3  : Using a nail art pen or brush, care draw a small spiral at the bottom corner of your nail.

Step 4  : Draw a slightly larger spiral next to it, going in the opposite direction. If you have short nails, you can stop at this, for longer nails, continue with the steps below.

Step 5  : Draw two curvy lines as shown in the pictue on the opposite corner of your nails.

Step 6   :If required , fill in the gap between the lines with a glitter polish and add some stones.

Step 7  : Finish off with a final layer of top coat to protect the design. That's it :)